Wednesday, September 10, 2008
NTFS EDITOR FOR MAC OSX
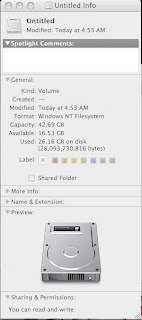
Now you are having both Mac OSX and Windows in your Macbook. Usually Windows Hard Disk partition is in NTFS format. Mac OSX has the capability to read and edit either FAT or FAT32 HD format. However for the NTFS format, it can only read it, but not edit. This would cause a problem for you, since you would like to do some editing of the files that you have saved in the Windows NTFS hard disk, when you are in the Mac OSX boot.
NTFS also has several advantages over FAT32 format, which you can read yourself elsewhere. FAT32 also has a limitation of 32GB only. You need to use a NTFS format if your partition is bigger than 32GB.
There are two ways to do this, both using a third party software.
1. Using McFuse and NTFS-3G, which are both freeware. You need to install them both to make it work. However after reading the instructions, it looks a little bit complicated for an amateur like me.
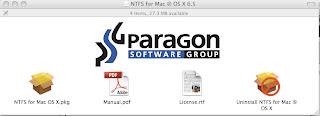
2. Using Paragon NTFS, which is a shareware costing around USD40. It is very easy to install. After the installation, you just need to restart your Mac, and it works immediately. There is a trial version available which runs for 10 days only.
So, now you can do the editing of the files that you have saved in your Windows NTFS hard disk without doing a transfer to a USB thumbdrive.
Next is to get a partition software for Mac, so i can keep all my documents folder (Home) in it and use that partition in both Mac and Windows. That would be great. Anyone can suggest me one?
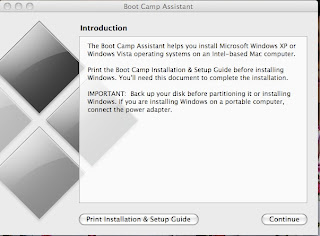
DUAL BOOTING YOUR MACBOOK OR MAC
You want both Mac OSX and Windows in your Macbook. This is due to several reasons. Some of the softwares that you have previously doesn't work in Mac OSX. Even then, if it works with Mac OSX, you still prefer it to be done in a Windows environment. Or you are being greedy to have it both. With Mac OSX 10.5 ie Leopard it can be done easily using Boot Camp.
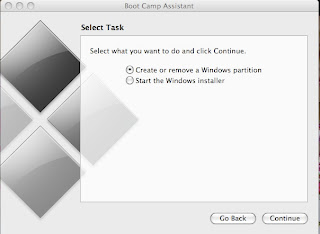
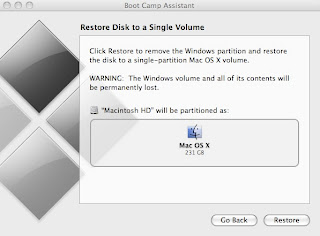
Just open utilities from the finder. Click on Boot Camp Assistant. First, print the installation guidelines. This would be very useful during the setup. Then click continue. You first need to partition the hard disk to accomodate the Windows installation. Select the size of the hard disk that you want to allocate to Windows. About 20GB is good enough for Windows. If you want more it is your choice. Then you follow the instructions given. This is when the printed manual becomes handy. You can only use Windows XP Home or Pro, Service Pack 2 or later (better to have Service Pack 3) or any type of Windows Vista. I did a Windows XP Professional Service Pack 2 installation which i later upgrade to Service Pack 3 via Microsoft Online update. The good thing about Boot Camp, if you don't like the Windows Partition, you can just remove it also using the Boot Camp Assistant. Please refer to the manual.
After the complete installation, you need to put in the Mac OSX DVD (you can find it in the small box that comes with your Macbook). This DVD will install all the drivers needed for all the hardwares in your Macbook to work with Windows. After doing it a few times (installing and removing Windows from Mac), i found that Windows installation is much easier and faster on a Mac due to availability of this DVD.
Next you need to do a software updates. First you need to update the usual Windows programme using Microsoft Update. Then you need to update the Apple Software (from the program file Window). Since you want to use Windows, you need to have a good antivirus, spyware programme, etc. I am using Kaspersky Anti Virus 9.0 for this.
So, now you have a dual booth Mac OSX and Windows XP or Vista in your Macbook. However there is another option of running Windows in a Mac OSX without rebooting your Macbook. This is to use a third party software such as Parallel or VMWare Fusion. However both of these softwares are sharewares. Boot Camp is free and preloaded in your Mac.
Tuesday, September 09, 2008
END NOTE FOR MAC
Have been using it for my reference manager for the past few months, after getting a tutorial from Dr. Jamaluddin. End Note for Mac is slightly more difficult to use as compared to Windows. For windows, it is just click on the download citation manager and then open the file in End Note, the article will be downloaded into End Note. For Mac, it need to be downloaded to text. Then we have to import the text file. Until now, i haven't managed to import any reference yet. As for the Microsoft Word integration, i couldn't find any link for the End Note integration.
So, as for now, when i want to download new reference, i would use End Note for Windows. Then i will copy or sync the End Note file for my paper into my Mac.
This is possible since i am using Boot Camp in my Macbook, with both Mac and Windows XP Pro installed. For sync, i would use Chronosync.
This will continue, unless someone can teach me how to use End Note for Mac. Or when i have a good knowledge and skills to use End Note for Mac.
This is the weakness of Mac.
Wednesday, September 03, 2008
USB BLUETOOTH ON EEE PC 900
I just wanted a bluetooth in my EEE PC 900 just for the sake of completeness. You want everything available. Since bluetooth is missing in EEE PC 900, i kept just thinking how to install it. So bought myself a USB microbluetooh which extends about 1 cm beyond the usb port. So i went to EEE PC wiki. Used the instructions given.
dmesg
sudo hciconfig
But i am stucked at the "sudo hciconfig". Command not supported. Searched the forums, not very helpful and some complex advice. Later on found out that actually hciconfig tool is not installed in EEE PC 900. So, what i did is doing the update of the EEE.
sudo apt-get update
sudo apt-get install bluez-utils
Then confirm and say yes to everything. After this only you will have the hciconfig. Then continue back what was mentioned in the EEE PC wiki.
sudo hciconfig
This will list the bluetooth interfaces.
sudo hciconfig hci0 up
This is to activate the bluetooth.
sudo hciconfig hci0 down
This is to stop or deactivate the bluetooth.
So, you can use bluetooth with your EEE PC, it was very easy to install.
I need to remember these three command to activate or deactivate my BT.
sudo hciconfig
sudo hciconfig hci0 up
sudo hciconfig hci0 down
So, whats next. A lot more things can be done with the bluetooth such as:
- using your Nokia phone or WM6 smartphone internet sharing or 3G via bluetooth.
- using a BT GPS
- using A2DP with your stereo BT headphone.
This is for later. Might start with the BT GPS first since i already have an internet connection with my Sierra 875u USB modem, which make the internet sharing option not very important.
Hehe!
Monday, September 01, 2008
WINDOWS XP PRO ON EEE PC 900
Tried an experiment few days ago to install Windows XP Professional on my EEE PC. It took me nearly half a day since i need to use a USB thumbdrive since i don't have a USB CD or DVD drive around. Installing Windows through USB thumbdrive is painstakingly very slow. One complete installation need around 1 hour. However later on i have problems in making the EEE PC to dual boot. With the problems of the dual boot, i later on decided to have only Windows XP for the EEE PC. So, i have now a Windows XP EEE PC. Tried to use it for two days. The boot time for the EEE PC is very slow, which takes forever for me (about 3 minutes). However with Windows XP i have the advantage of installing other softwares such as SPSS and etc.
So, after two days, due to slowness of the boot time, i decided to switch back to Xandros. The USB thumbdrive method to recover the Xandros from the supplied DVD is very easy. It took me about half an hour to reinstall the Xandros on my EEE PC and also format the primary and secondary drive. Currently very happy with the Xandros EEE PC. Now, this post is typed from my EEE PC with Xandros. The boot time is very fast around 15 to 20 seconds.
Will never install Windows XP again in my EEE PC.
Haha.
WELCOME TO RAMADHAN
Today is the first day of Ramadhan. To all muslims out there, happy Ramadhan. This year, it will be the first time, my second daughter will be fasting. She is seven years old now. Luckily for the first day of Ramadhan this year is a school holiday, post "Merdeka". Hope that she won' be tired for the first day of fasting.
Subscribe to:
Posts (Atom)